My Chicken Little Story
by Bob Roberts
Here's my quick reply... there is not a problem with the part, has never been a problem with the part & I don't expect there ever will be a problem with this part. Now I'll tell you why I know this.
I could keep talking about this part in the blind throughout, but I'm going to bring it out into the open here & now for better reference. My "Chicken Little" part is the 7905 regulator. I've never found a bad regulator of any kind, straight from the mfr's tube, ever & I've been working with regulators a long, long time now. K... how do I know....
My supply of 7905s from my business stock ran out in 1997. Since that time I have reordered them no less than 20 times through 7 different sources. I'd have to be the most unluckiest person under the sun to have gotten bad parts that many times from that many sources... and, incidentally, 4 different brand names that I can recall. Is that it? No! Since it is all sales final I do check everything that I can prior to shipping and the 7905 is no exception. When parts come in I take a sampling to test from the various tubes... maybe one from an end & one from the middle. This is for my protection because if I ever really did get a bad batch of anything & didn't find it out until my old stock was used up... well... by that time any report that I made to the supplier would be laughed at. In fact, it takes a Philadelphia lawyer to get a supplier to take back something on the day that you receive it when they send you a wrong part, let alone a defective one :-()
For your protection I test the parts just before shipping, or sometimes... when I'm looking for a break... I'll sit down behind the scope & test a complete batch at one time. I still test each & every power supply that comes in & I have not found a single bad one yet in all these years, yet I keep doing it because as sure as the sun rises, if I skipped one it would be a dud :-( Parts that are used in any of the kits that we put together I test when transferring them from the shipping tubes to the kit bins. Such is the case with the 7905... each & every one of them has been scoped prior to going into a kit & are known to be good from the mfr.
Is that all? No... I have checked through my email archives & found another interesting fact. No one has ever reported having a problem with the 7905 in the majority of uses... about 60% of them! The only recorded problems are all germane to the Atari A/R boards. Hmmmm... they work in every instance except when installed on A/R bds? I don't think so & I will add in here pertinent notes to A/R bds.
First off, almost every app in coin-op uses 1 amp 7905s, e.g., L7905C, but I always buy in the heavier duty 1.5 amp regulators in hopes of added longevity. As they say... they should take a lickin' & keep on tickin'. My current stock is factory fresh delivered in April of 2005 & mfr'd by ST Micro.
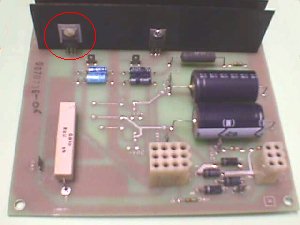
K... here's a pic of the 7905 as used on the dreaded A/R bd that seems to reject them. The first thing that should be obvious is that the 7905 needs to be isolated from the heat sink, unlike other apps where it may be okay to fasten directly to the heat sink.
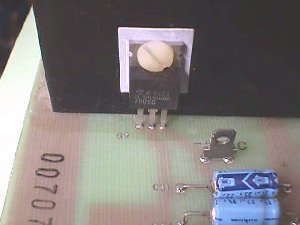
Here in the closeup you can also see that the screw needs to be plastic to prevent shorting to the heat sink. When changing this component if you use the old insulator you need to carefully check it to be sure it has no tears in it... absolutely use it or a new insulator... use heat sink compound to paste the insulator correctly on the heat sink with the holes aligned. Dab a little compound on the back of the 7905, put the legs thru their respective holes in the PCB, align the plastic screw & install it. Once tightened you can solder the legs & cut off any excess protrusions. Also, since the legs are so close together on the solder side check carefully to see that a solder splash has not joined any two legs together.
A few other precautions that come to mind are first do not overheat the solder joints when removing the old 7905 & be careful to have all the old solder removed from around the legs before pulling it out. The reason for this is that you may pull the thru-hole plating from the PCB if it is not completely free. The heat sink is at ground potential & the reason that the 7905 must be thoroughly isolated, so you can take an ohmmeter after installation & measure between the heat sink, the ground tab or any place you know to be ground, and the tab on the 7905. If it reads 10 ohms or under it is shorted & needs attention pre power-up. A typical reading after filter discharge here would be 5K ohms, so you can safely assume something is amiss with any reading less than a Kohm.
I notice in emails that a lot of attention is placed on voltages being wacky. This comes from attempting to measure them unloaded. Typical unloaded DC measurements would be as follows:
The -5VDC TP is more commonly measured at -7VDC unloaded, but in 2 out of 3 working samples that I pulled & tested I got -14VDC & -15VDC & as soon as I loaded them down... dead-on -5VDC analog! I've seen similar results in switchers & my guess is that the huge swings are attributed to the particular type used or in the way they are manufactured. K... curiousity got to me here. I just pulled the A/R bd that gave me the -15VDC unloaded & changed the Texas Instruments 7905C that regulates to -5VDC just fine under load with one of the ST Micro L7905CV from my current stock. Results.... -6.5VDC unloaded. What that tells me is that I shouldn't be concerned with an unloaded reading of the -5VDC since both components performed their tasks flawlessly & that's as far as my curiousity takes me at my age :-()
10/10/12 Note... And the beat goes on...
Twice in the last 10 days this has been brought up in email. One of them came back with a retort I've had a dozen times & have answered privately, but it needs to be here. First email... my -5 volts reads -15 volts. I say because it is unloaded. The second email reads... "I put the a/r board back in the game & I still read -15 volts on test point??". This is Atari games & here is why: Many of the game titles do not use the -5 volts, even when the schematic shows that it is, hence, the -5 volt reg has no load on it. The 1.5A does not have an internal compensating circuit like some of the 1A ones do. Sometimes a third email... "all the wiring is in my game right up to the edge connector." Yes... all the harnesses have the wiring in place, but if you go a step further & look at the pad on the PCB you'll notice it is a blank pad leading nowhere!
As a side note:
Another place I saw this in years gone by was in switching power supplies... back when they were worth the effort to repair. In games that did not need -5 volts reading at the PS terminal would typically be in the -13v to -17v range. Often times the the 12v would be way off, as well. Biasing voltages are not that critical on game bds, anyway. The voltage to be concerned with is the 5vdc & that is why it is adjustable. It should be set to read 5 volts on the 5 volt rail of the PCB, not at the terminal which may end up being as high as 5.5 volts due to load & line loss.
Some have noted wild & crazy voltages at the AC input to this circuit... 36VAC... and I believe this comes from improper measuring. The only reason to check this at all is if you wanted to know for sure that AC was being provided at all. Remember that AC is not measured with respect to ground as is the DC voltage. If you're looking for a close to 36VAC reading you'll have to measure across the winding, typically 2 red wires from the xformer in this Atari instance. I wouldn't be surprised to find the voltage off by 6VAC either way when measuring this. Since this winding is center tapped it does have reference to ground, but measuring from ground to either red wire will only produce half the reading, i.e., 18VAC & again, this is not something that needs to be dead-on... your meter may even read 25VAC & have the circuit function normally.
You really do have wacky voltages at the 10.3VDC TP & it's not working... time to check the bridge rectifier under the xformer assembly. The voltage appears to be correct, but it's not working... sub in a new Big Blue. Although the bridge & Big Blue are not directly tied to the other voltage circuits they can cause eratic readings in them, as well.
Well... that's my "Chicken Little Story" & I'm sticking to it... jeez, I hope not :-)
Hmmmm... in looking this over I noticed that I really haven't rambled far off topic... well... a loosely based topic :-) ... so, I'll share one of my wild stories from the past with you. It may have some relevance here.