FAQ How can I check the Big Blue cap to see if it needs to be replaced?
In MHO the very best way is substitution because the results are absolute and, in this case, it is almost certain that it is due to be replaced. Short of substituting, when you think this cap may be the cause of your problem, or any filter cap, for that matter, there is an inexpensive way of quick testing them by bridging across them with another electrolytic with similar uf & voltage ratings. The Big Blue values used were 26Kuf, 27Kuf or 28Kuf rated at 15 volts, so ideally you'd need something in the range of 25Kuf to 32Kuf at 15 volts or higher to bridge across the existing cap for testing. Actually, anything in this range would be fine as a permanent replacement, as well. The basics are to jumper in the test cap by using two alligator clipped leads making sure to follow proper polarity... positive to positive & negative to negative (lest you receive a big surprise)!
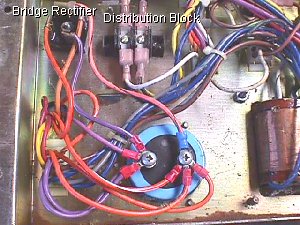
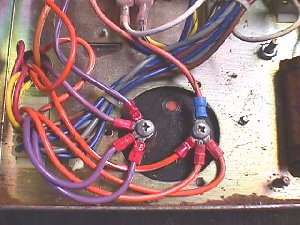
I'll do this the long way, so that you see what is going on & then give you a shortcut afterward. In the pic of the underside of the Atari xformer assembly above I marked the bridge rectifier because this is another Q that is asked pretty regularly... where is it located? I also added the + & - symbols to the Big Blue. As you can see, the orange wires go to the + terminal & the violet wires go to the - terminal.
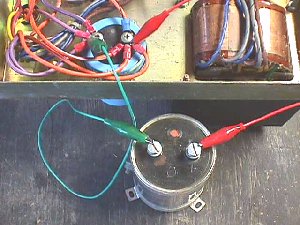
K... this is for illustration only as I have just barely clipped this 28Kuf15v cap in. I use these premade jumpers because they are more forgiving if you make a mistake in any hookup & will usually pop open right at the clip before any serious circuit repercussions occur. If you're using them for a permanent tester I would suggest using crimp-on ring terminals & color coded jumpers... black - & red +... leaving alligator clips on the business end only.
If your symptom goes away with the bridge then you need to replace the Big Blue permanently.... don't try to leave the bridge in as a permanent repair! This method is true in other circuits, as well, whether it's looking to cure an audio hum, a bar roll, a weave or a postage stamp pic. One caution is that since an electrolytic does store up a charge, you'll need to leave it hooked up a few minutes after powering down the unit under test to allow the cap to bleed off the charge. You can also do this by clipping it across a 1K to 2Kohm 5 watt, or better, resistor. It's good practice to discharge the test cap with a resistor in this manner before using it to test a cap & if multiple caps are tested, after each use, so that a stored charge is not released into a circuit where it may destroy a component.
Usually, when the filter has lost capacitance it is just less than needed to prevent your symptom, but it is not completely dead, either, so your tester really doesn't need to be ideal in uf value as long as the voltage rating is at least equal to that of the cap being tested. If all you have handy is a 10Kuf15v cap it may very well be enough to bring the capacitance up enough to let you know that replacing Big Blue will cure the problem. Conversely, if you had a 10Kuf15v filter in a linear power supply that was acting up, you could bridge it with the 28K15v tester or any Big Blue to see if it was the source of your problem. Again, never leave a bridge in... it's just for a temporary quick test.
K... I said I'd give you the shortcut to testing a Big Blue.... one that can be used in many situations. Since these are filters to smooth out your supply voltage you can usually look at the schematic for a point that is electrically the same, but in a more convenient place to test. In the case of Big Blue, it filters the 10.3VDC supply voltage to the A/R (audio/regulator) board & a quick look on the A/R bd shows that there are test tabs for both 10.3VDC & ground, so clipping in thru these tabs saves from having to unbolt the xformer assembly to get at the Big Blue terminals. Of course, if it proves out bad you have to do this anyway, but if it's not the cause of your woes you've saved a little time.
While I'm here I may as well show how to replace Big Blue with a larger physical sized cap. This is something that often has to be done with the Midway suitcase PS. It's a little easier with the Big Blue as the assembly has plenty of room to mount a larger cap, so that mounting remotely in the cabinet bottom is not necessary, but nonetheless, still an option. I know that a lot of you are looking for a cheaper way to replace these Big Blues since the new ones keep climbing in price. Like so many other things these days, no one stateside wants to mfr them :-(
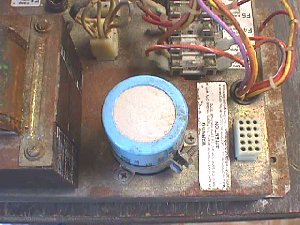
The first thing to do is disconnect the terminals of the Big Blue on the underside, then remove the 3 screws holding the mount to the framework... saving the screws. Next... set a 2˝" cap & mount over the opening... center it & mark the 3 holes with a permanent pen & then drill them using a 1/8" bit. The same self-tapping screws will go right back in the new mount.
Rotate the cap so that the + & - are in the right position & tighten the mounting clamp to the cap.
Flip it over & replace the wires on the cap terminals & tighten them down. Using these mounting clamps you can mount a cap upside down in a cab bottom & run wires to any circuit that needs a filter.
Multi-value caps.....
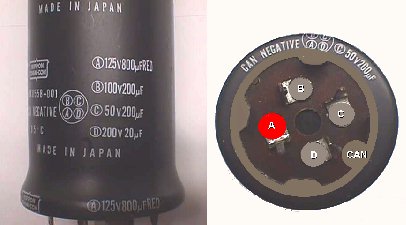
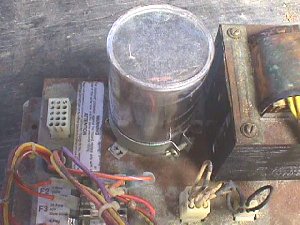
The large metal multi-value cans are nothing more than what their name suggests... several electrolytic caps in a single housing using a common "can" ground. Yes... you can bridge across these when testing, as well. If you find a bad section, but are unable to find a replacement cap with all the values, you can bridge in a new axial or radial single unit, whatever you have room for, however, you must clip the leg of the bad section, eliminating it from the circuit. If you use an axial cap you need to cover the legs with spaghetti or heatshrink tubing to prevent any nasty shorts from occurring. If you find yourself without either insulator for the legs you can use the insulation from a piece of scrap wire. Supposing you found "B" to be bad on the cap pic'd above... 200uf100v... you could replace it with today's common cap of 220uf100v, or better, in either a radial (both leads coming out the same end) or an axial (lead coming out of each end) cap.
The cap I used for bridging is available on the Parts Page along with several other values that could be used for testing purposes. There is also a box of good used CG caps on the Specials Page that would come in handy for testing a variety of caps.
Happy Gaming...