Here's another of those common hindrances that has been around since we started buying imported isolation transformers back in the 80s & I guess it is destined to be around for many years to come. I think I have bought isos from every company selling the imports & it doesn't seem to matter if they were made in Mexico, China or any other country, they all seem to have this common thread that bonds them together, or not ;-) [No pun intended!]
I call this the *alarm clock syndrome* as that is essentially what you have... an electric alarm clock buzzer in its most basic form. If you've installed more than a couple isos I'm sure you have been jumped out of your shoes at some point in time by this syndrome. You get your iso all installed & plug the game back in only to hear a loud buzz... sometimes deafening... and you quickly unplug it & wonder what on earth you did wrong! Well... you've made an alarm clock buzzer during installation or perhaps the iso took a hit during shipment & was already one when you received it.
The alarm in an alarm clock is a buzzer... for this instance, anyway, and what is a buzzer? A buzzer is nothing more than a piece of metal (called an armature for those who would like to know) positioned over an electromagnetic field in such a way as to vibrate it producing a *buzz*. Great to wake you up in the morning at a specified time, but when you're doing a smoke test on a new piece of equipment it can be quite inappropriate to say the least.
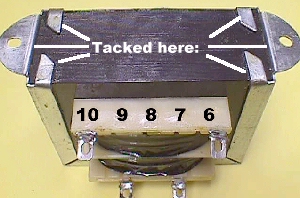
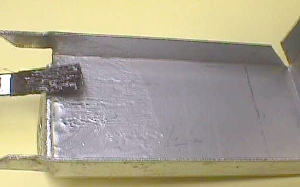
The pic above shows where the case is tacked to the laminates... the body of the transfomer... by the elemi that bonds the laminates & when one side or the other breaks free from this tack, well, you have the armature just lying in wait, readying itself for you to give that transformer some power to make the electromagnetic field that it is missing.
As I said, a good thumping in shipping will break one of these free & that is why I open every case that comes in & remove each & every iso & inspect it. If it's solid I place a piece of Styrofoam across the front where the terminals are... another thing that is easily damaged in transit... and then wrap them tightly in bubble for reshipping. This gives you the best shot at not starting with the alarm clock, but the number one way that this event spawns is through the mounting procedure. This can be from using oversized screws... too large for the diameter of the mounting hole & something has to give... or it can happen with the proper size screws if they are to the outside of the mounting holes. Once the first screw is in toward the outside of it's mounting hole it leaves no slack & is unforgiving when you go to the outside of the second screw's mounting hole, as it puts pressure akin to a wishbone at Thanksgiving time on the case & quietly separates it from the body.
In building games, on a bad day, I have made as many as 6 alarm clocks myself, so I know it is easy to do, especially when using these large battery driven screw guns that hug & bump the xformers during the mounting procedure. If just one side breaks free you can simply remove that side & angle the screw toward the body to tighten it back in place. If you break both sides it is time to remove it & repair it because it is not going to tighten sufficiently to prevent all buzz.
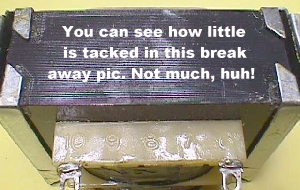
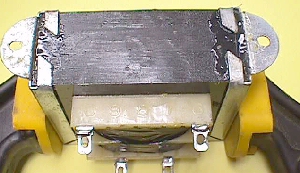
Pic'd above is one that I broke the tacks on... very easily by just tapping a small screwdriver's blade in between the case & the body. Incidentally, I did power this one up on the bench in the state you see it. It buzzed & vibrated so loudly that it startled me even though I was expecting it, vibrated a pair of pliers from the bench onto the floor and it brought Alice running.... "you've finally blown something up, haven't you?"
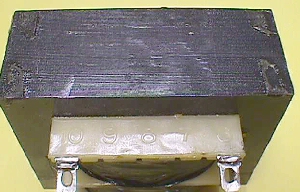
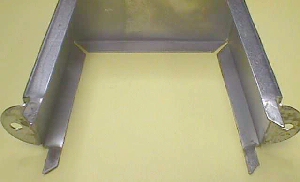
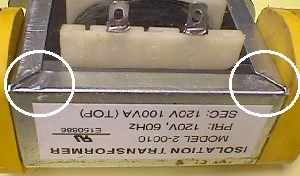
Here it is without the case on it & you can see the the tack points a lot better & how little of the resinous material is actually holding that case in place. Below is the removed case & you can also see how clean & free of elemi that it is, other than at the tack points.
I guess you've figured out by now that I am purposely breaking this xformer so that I can show you how to put it back together. When I have to put them back together I use GC's Radio Service Cement, but that is kind of expensive for a one time repair, so for this one I asked Alice to pick up some cheap glue at Wally*World (Wal*Mart) for me to try. She brought me back change from two bucks & the product pic'd below which, quite frankly, I had doubts about, but it actually did as good a job, if not better, than my more costly regular cement.

It looks like a big tube of toothpaste, but it's really a pretty decent adhesive. I was accustomed to using the applicator brush built onto the cover on the GC product, so I just used a 1/4" china bristle brush to paint the adhesive where I needed it.
I actually painted up a little higher than I usually do... going up about 1" on each side where I usually only go approximately a 1/2". Next... slide the case back on all the way.

I like the Quick-Grip tool as pic'd above for holding these in place & put it near the top whereby I can place it on a hard surface to tap the tabs back into place. To do this I use a little kid's hammer... something that is indispensable around the shop... when Big Bertha is definitely not the tool to use :-)
Once the tabs are tapped into place you can add a tad more adhesive if needed. I don't know if this next step is needed, or not, but I figure it can't hurt & it might help. I turn the xformer on the side & brush a little adhesive into the open 45s at the top corners as pic'd below.
Now we are ready to bake it & the oven has to be set at 350ş.... no... no... that's another project! :-) For this one all you need do is let it stay clamped together overnight or whatever your particular adhesive instructions say.
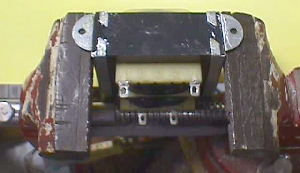
Don't have the Quick-Grip... here's the alternative... a standard bench vise. Your xformer is going to be so quiet that you'll wonder if it's on! It IS, so don't touch one of the terminals as a test :-(
I recently had an EE tell me that he thought his xformer was defective because he thought it was the laminates separating under the case. I'd never seen, or heard of this in practice before, so I took the liberty of removing an old one, popping it open & then using the same small screwdriver that I used to open the case, I split the laminates apart in several places. I powered it with no case... no noise, buzz or otherwise. Then I replaced the cover with no adhesive & tapped the tabs back down & powered it once again. It was quiet without doing anything to it until I tried to pull one side away from the body, at which time I got a low buzz. I went ahead & applied the adhesive & clamped it up overnight. The next day when I powered it up it was as quiet as the new one.... and I didn't touch a terminal to check for output :-)
I've seen a few cases of the alarm clock syndrome in older games after they have been transported from one location to other. Nowhere near as prevalent, but nonetheless it does occur.
Happy Gaming...........
Isolation transformers can be found on the parts page below.
Help Page Index Big Bear's Bulletin Board Site Index