Leaf Switch & Button Solutions
by Bob Roberts
As usual, I'm extremely short on time, so I'm going to throw up a start of this button solutions page...meaning to get back to it & elaborating it to it's fullest potential, but good intentions & time sometimes do not meet, so in the meantime, these are picture solutions that I have been emailing to interested parties and hopefully, they will reach a lot more newbies up here & maybe a few collectors who were left out in the cold on this one.
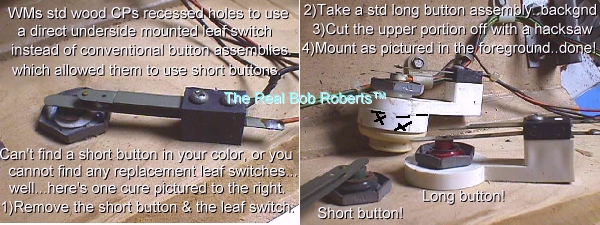
Williams wood...pressed wood...type control panels shown above & hopefully the type on pics will show up clearly enough to read. Also, note that there are leaf switch holders already cut down to serve this function, but they too, are not always around when you need them.
New Leaf Holder/Switch For Wood CP - $4.50
Below is one of the metal control panel leaf switch button solutions.
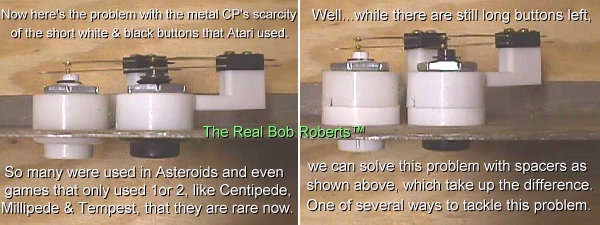
New Leaf Holder/Switch/Spacers For Metal CP - $5.50
3/22/00...see, I am adding to this page :)
I get asked almost daily about the Nintendo buttons. While these are not leaf type buttons per se, they do use a button similar in style, if not in size, to activate an adjustable microswitch under the CP.
I have a CP construction page on my agenda, but thought that I would address this issue here on this page since it will be some time before I get a chance to complete the CP page.
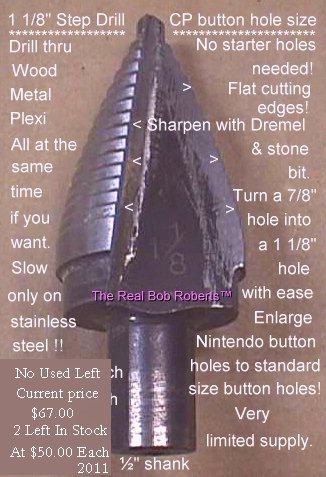
On to the Nintendo solution I used and probably most shops nationwide, I would surmise. The holes for the Nintendo buttons were 1/16th inch in diameter smaller than the industry standard of 1 1/8" in diameter, so the typical leaf or micro buttons would not fit through them. Many an op tried to force them into fitting, only to end up cracking the plastic overlay.
Since I was already using 1 1/8" conical bits (now AKA step drills) for drilling all holes in control panels, I simply used it to enlarge the holes to accept the larger & more commonly available buttons.
In the pic below, I have a CP on the jig in the carpentry shop to enlarge the holes, but this can be done readily on the game.
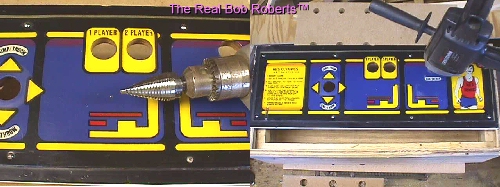
To do this on the game, you need to lift your CP, remove the buttons that you are going to replace, take a newspaper and open up several layers to form a catchall for the debris placing it in the opening between the front of the game & the monitor. Now, making sure that any hanging wires fall out of harms way, set the CP back in it's mounting position. Enlarge the holes with the conical bit, or if this is not practical for you, you can use a round file & carefully work your way around the entire circumference to
evenly enlarge the holes.
Once the holes are all large enough for your test button to drop through, you can gently raise the CP up from it's mounting position, and then carefully remove the catchall newspaper container & toss it. This catchall method comes in extremely handy when adding a button hole to a metal control panel, since you surely do not want any metal filings getting lodged into your pc board or power supply.
Here's a temp pic that will be moved to the CP page in the future, but for
right now, it may as well be up here where someone may get some use from it.

Happy Gaming...........
|
Help Page Index Big Bear's Bulletin Board
Site Index