Pac/Ms Pac-Man Sockets
by Bob Roberts
Pac-Man series of Midway Mfg Co
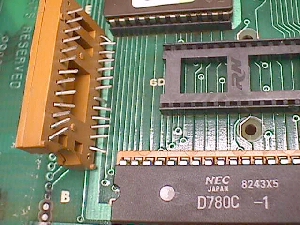
Here's another topic that comes up at least 3 times per week, so it's earned a place here where it may be helpful to the newbie, or at least new to owning a Pac game, and that is the intermediate sockets... brown sockets seems to be what they are commonly referred to as... that go between the Z80 Buss Sync Controller (285) & the dip socket on the main bd, and also between the V-Ram Addresser (284) & the main bd dip socket. These are installed there to raise the satellite bds up enough to clear components on the main bd.
Ops use to mistakening blame these for their Pac woes & often times they were damaged when they removed & inserted them with pins to the outside or inside of the dip sockets that they were to be plugged into.... breaking pins off more often than not :-( Sometimes just removing the sync controller to gain access to swapping the ribbon cable lead to a poor reinstallation damaging the pins of the riser sockets. My findings over the years showed that if there was actually a non-manmade problem in this area, it was the Augat dip socket on the main bd. Granted, some were ruined prematurely by the op that removed the riser socket & chucked it in the bottom of the cab, placing the satellite bd directly into the Augat spreading the single wipe pins to the point of snapping off inside of them :-(... but they were poor sockets to begin with and, unfortunately, Bally/Midway used them in lots of their bds.
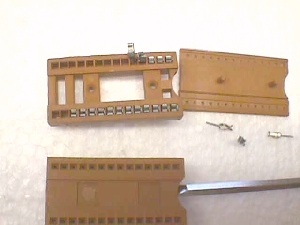
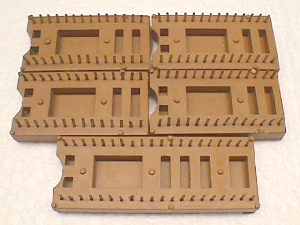
Above is pic'd a typical socket plucked from a cab bottom grave where it was left as dead. I personally like these riser sockets & always rescued them from their premature resting places. The pic below is of what most would consider junk to be thrown out, but what I see is 3 definitely good sockets & the potential to save another five sockets from oblivion!

How is this possible? Well... it's pretty easy since these sockets were made in such a way as to allow you to change single pins in them. Take a look at the socket below with the cover gently pried off the top exposing the pins. You can see that they can be gently pushed up from the bottom & removed to be transplanted to become the missing pin on your existing socket. Take notice of the sculptured face of the pin & reinsert it into it's new home facing in the same direction as the others.
If you find yourself in a position where one of your sockets has a broken pin & you don't have a replacement pin, or an old socket to remove one from, then I would recommend keeping the good one in place & replacing the cripple with a standard dip socket, keeping the cripple for future use or repair. If the main dip socket has had the wire wrap posts of the sat bd plugged into it you'll have to replace it, as well. Two standard 28 pin dip sockets is an inexpensive repair that can be changed out in the future with no trouble.
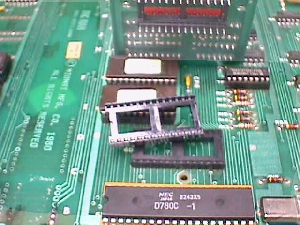
These sockets will stack up readily, but you still need to take caution when inserting them into each other. It doesn't take any more time to keep an eye on the pins, making sure to guide them into the proper positions, than it does to insert them sloppily... which usually results in you redoing the work, anyway :-(
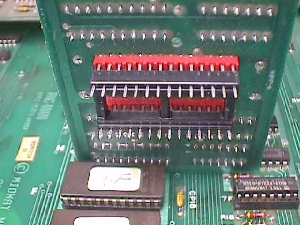
Once you have in place & have tested the board it's time to strap them down. There are holes on either side of the sat bd socket & main bd socket that align to allow you to use a cable tie to strap them in securely. I've found that it is easier to use two 4" cable ties... feeding one up through from the bottom & one down through enabling you to join the two on both the top & the bottom allowing a greater range of movement & a tighter hold.
I still like these best & wish they were still available today. Well.. I hope this helps somebody get their Pac bd back on it's feet again. Hmmmm... Pac with feet :-)
Happy Gaming...........
All the help you will need with Pac games
can be found here:

Many Pac-Man parts can be found on the
Parts Page
Help Page Index Big Bear's Bulletin Board Site Index