Let me preface this with a little about what I call Monitor Syndrome, which is nothing more than preconceived ideas about arcade game monitors that almost everyone seems to have when they enter this hobby.
I guess the foremost one would be that somehow monitors are game specific. The first Q that comes to mind is...I need...I'm looking for...I need a cap kit for....etc for my Pac-Man monitor or my Phoenix monitor, as though each and every game has it's own specific monitor for it, and it alone.
This is not the case and there are only a handful of different types of monitors used in video arcade games. There are lots of different monitors with different scan frequencies used in any of a variety of applications, but for coin-op vid game purposes, there are only a few. They start out with old black & white one video input monitors, which you could use from one B&W game to the next, and then you had X-Y monochrome, X-Y color, RGB and now in more recent years VGA/SVGA have entered the picture. The most common monitors out there in the vast majority of video arcade games are RGB & the hobbyist is going to be working with standard resolution on the whole. There are some games from the 1980's that do use medium resolution monitors, such as Atari System II games, but overall the standard RGB monitor ruled the roost.
There have been so many manufacturers of RGB monitors over the years that I could not even ballpark guess at a number, but they all were one animal... that was capable of residing in any RGB std video arcade game....much like today's PCs that you would not think of going into a computer discounter's store and asking for a Packard-Bell monitor for your P-B, when you can get any number of brands of PC monitors to just plug n play with your PC. I guess it has something to do with it being inside this tall video cabinet that makes a person feel as though it is a part of the whole & as specific to the game as a 327 Chevy engine is to a Chevy.
The fact of the matter is, that you can swap these monitors of like types, between all manufacturer's games. Another Q is...What was...or do I have the original monitor that came with the game. I couldn't say that as I unpacked them brand new in the shipping cartons. Many of the games came with manuals for 3 or 4 different monitors used in a run, and at that, the monitor you found in the game was not necessarily one of the ones covered in the manual. I remember one mfger that was using Electrohome GO-7 or Wells-Gardner K4900 series very vividly, as the monitor that came installed in the game I uncrated was one made by a company called RGB Display.
Then at the distributor level you might have a change from a shipping accident or even their mishandling of the game...the new guy that removes the back & props it against the cab, backs into it, knocking it into the neck of the CRT, hearing that sickening sound of pssssssssssss as the vacuum is released. Do they fool with putting a new CRT on that frame??? Most times it is cheaper to just toss another new monitor of their preferred brand on hand into the game & get it delivered & making money, while having a perfectly good chassis for testing or selling, or even replacing the CRT at some slow period in business.
Now it's on the streets taking in those quarters...quarters...quarters! The op goes to collect his money & finds that one of his games has no pic. Does he take that game from the location for repair...losing those quarters, when he has some games sitting in the back of his place collecting dust... ones that never recouped enough money to pay for themselves...no way! He's got that good monitor, whatever brand or model it is, half way out of that cabinet before he even gets back to his shop, and within a matter of a few hours, it is residing in game X on location taking in those quarters again. Who's to say what monitor HAS to be in a game to classify it as original? You have a good picture that you are satisfied with.....it's original!
Well.... now that we know RGB is RGB, we also know that we have the means to do tests on the monitor out of it's cabinet & on a bench by way of an extension cables. The AC extension is easy to deal with. Just keep in mind that the monitor must be powered by the isolation transformer in the cabinet, so you want your power extension to simply interupt & extend the plug that is closest to your monitor, as this will be at a point beyond the isolation xformer....DO NOT PLUG OR RIG YOUR MONITOR UP TO THE HOUSEHOLD CURRENT AT A WALL RECEPTACLE!!!! You can hook up an isolation transformer on your workbench if you have one, but it is not necessary for a hobbyist to have a powered workbench, per se, since a majority of you can, and do, work from the cab & on those special ocassions when you want to attempt a way-out-of-cab repair, it's usually on the new coffee table & you do not plan to fire it up there.
CAUTION: HAVE A FUNDAMENTAL KNOWLEDGE OF ELECTRICITY FIRST AND NEVER RIG YOUR MONITOR UP TO THE HOUSEHOLD CURRENT AT A WALL RECEPTACLE UNDER ANY CIRCUMSTANCES!! AN ISOLATION TRANSFORMER SHOULD BE USED WITH EVERY MONITOR YOU RIG UP TO WORK ON!! YES... THIS INCLUDES THE LATEST CHASSIS' THAT DO NOT REQUIRE ISOLATION!! ANYTIME YOU WORK WITH RAW AC VOLTAGES AT ANY TYPE OF WORK STATION BE SURE IT IS ISOLATED. THERE IS ALWAYS A SHOCK POTENTIAL PRESENT!
Okay...got AC...now you need an RGB video & sync extension cable. This is not only handy to work on your monitor, but it can be an extremely useful piece of test equipment teamed up with any other video game with an RGB in it, or even a spare monitor sitting around that you know is good...or maybe one that you just want to find out if it's good or not without actually installing it in a cabinet. I've been making & selling these extensions for over twenty years now, so let me place a pic here to save another thousand words.
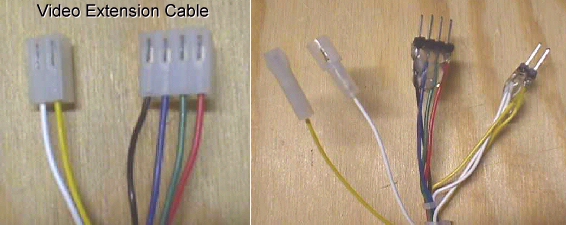
As you can see above, the video lines color coded Red-Green-Blue-Black (video ground), are pretty standarized in order, whether you have 2 headers, a 6 position or 10 position single header on your monitor chassis, they will line up correctly. Exception: Hantarex 9000 is B-G-R, but knowing this, you need not even try to change the order to accommodate this model, since if you see the colors are reversed, but everything else is fine, it's done it's testing job for you.....whether it be monitor or a game board you are testing. Now the reason that the signals are divided up between the 2 position & the 4 position Molex .156 housings, & headers pins on the opposite end, is to accommodate all the different header layouts on the monitor chassis' themselves. If you have a single 6 position header on your monitor, you can put the 2 closely together to comprise an equal to the one being extended. If you have a Wells-Gardner K7000 which has a 10 position single header, you can put the 4 position on the first 4 pins & then the second 2 position syncs can be placed at the other end on pins 9 & 10. Actually, on the K7000, if you have composite sync you can feed pin 10 only.
In the pic, in the middle, you will notice that there is a bullet plug on the sync wires (yel & wht), and when plugged in, it simply combines the horizontal & vertical syncs to make a composite feed.
Let's take a game that you have that has a screwy looking pic on it... you want to know if it is the fault of the monitor or the game board. One way is to go from a working game in your collection to the unknown one. Take the backs off of the 2 games to be used & make sure they are unplugged from the wall...safety first! Let's be more specific about the games. Let's say your Ms Pac-Man with a GO7 monitor has the screwy pic and all you have nearby is a Bad Dudes with a WG K7000 in it. You know that your Bad dudes pic is great, so the signals coming from it are ok. This is a 10 position header type monitor, so you plug your 4 position header on the extension up to pins 1 thru 4 mating up to the color coded wires already on the housing. Next you would see that you only have one white wire in position 10 of the Molex housing...that's composite sync & all that is needed to feed the K7000 ...so when you plug in your extension's 2 position header you'll have one of the wires going to an empty slot on the K7000 Molex housing. On the GO7 end, you need to feed both horiz & vert syncs or your pic will roll one way or the other. This is where the bullet plug comes in... if you plug it together, both wires going down to the 2 position housing for syncing the GO7 are now jointly fed with a composite sync. All that is left to hook up is the video & it simply plugs to the 6 position header of the GO7 from right to left covering 1-4 pins.
Now for the test...hmmmm...we don't need any power to the K7000, so you can unplug that monitor if you wish. Next, plug both games back into the wall outlet & turn them on. Your Bad Dudes known good pic is now displayed on your Ms Pac-Man monitor. Picture's not screwy anymore & looks great....you have a Ms Pac-Man PCB or wiring problem in the Ms Pac-Man cabinet. Bad Dudes pic is just as bad as the Ms Pac-Man pic was....you have a problem with your GO7 monitor.
This is a simple extension....the K6100 X-Y color with 15 position Amp plug is the time consumer, but oh so very necessary. I can't recall how many Tempests, especially, that came thru the shop, and it was so easy to roll that roll-about cart with a K6100 good monitor on it right over next to the game & facing the front....just a simple plug up of the extension & you knew immediately where the fault lay. If you had to yank the whole monitor for bench repair, it sure was easy to burn it in afterward without actually putting it back in the cab.... a heavy & awkward installation done one time only!
Happy Gaming.....
Help Page Index Big Bear's Bulletin Board Site Index