This one has been topping the charts for quite sometime, so it's earned a spot up here.
Well... this is how I do it... right or wrong! First you disassemble the unit & since you only want to be toting the case bottom around for modification, I'd suggest you leave the harness on the optic bds with the case top in the positions they go in. This should be of help when you go to put it back together, physically noting where they belong, preventing you from mixing up vertical & horizontal wiring.
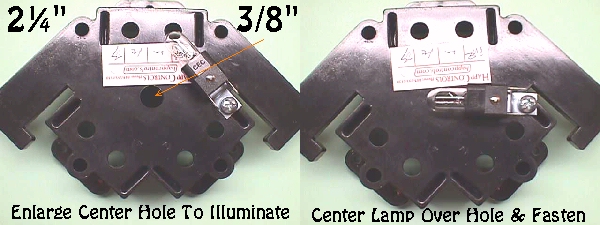
Next would be to wash up the bottom case with dish soap & warm water, rinse & dry, & you're ready to drill. The center hole needs to be enlarged to 3/8" to allow enough light through. I use a step drill for this, but I imagine you could use a std 3/8" bit utilizing the existing hole as a pilot. Now take your lamp/lamp holder & align it over the hole. If you align the filament inside the bulb with the center of the hole it'll give you a more uniform look. Keeping this alignment you can pivot the holder to a good location for fastening. If you are going to drill a pilot hole make sure that it will not interfere with any necessary components on the inside, e.g., don't drill the hole where the screw will go right up through under a bearing :-( I always chose not to drill the pilot, but to use one of the slots to either side of the case for fastening. The screw makes it's own threads as it goes. I've never cracked a case... hmmm, sounds like something that Perry Mason would never say :-)... in doing it this way, but I have wondered if things were going to go smoothly many times. I was afraid it would crack the first time I tried this on an old broken case, but that was not the case, proving once again that you just never know till you try something new.
K.... reassemble the TB unit & mount it back just the way you found it!!
Note: DO NOT overtighten the screws that hold the case together! They only need to be snugged up hand tight & trying to reef them will destroy them now, or later.
Now we need some power to illuminate this lamp. If you take a couple pieces of 20ga wire, 1 black for ground & 1 orange for 10-12VDC, about 10" long, you can fasten them in no particular polarity, across the 2 terminals of the lamp holder. Add a Molex 2 position connector to the other end & then cable tie it to the TB harness. This keeps it contained with less risk of it getting entangled in the moving parts of the TB. Note: If you decide to use a 6 volt lamp you can swap in a red 20ga wire for the orange above. Keeping power lines color coded is not only neat & useful, but it might save you, or some tech in the future, a whole lot of guess work.
Now you'll have to continue your wiring from the other side of your newly installed connector to whatever power source you have selected. I recommend that the 5VDC logic lines not be tapped into. Why add the extra load when you have such a vast selection of sources at hand. To keep lines to a minimum in most cabs you have your control panel & coin door break connectors in the same general area, if not side by side, making it easy to tap into coin door power lines. Obviously, your black ground wire can tap in anyplace that has a logic ground line passing by. As for the orange wire, most coin doors have a drop for 10 to 12VDC to provide power for coin lockouts, if used. Sometimes the coin meters are driven by 12VDC, also.
Oh... for the red wire people that are thinking if they can't use the 5VDC logic power, where do they derive their power from... many coin doors have 6.3VAC power available for coin rejector illumination, whether or not it is used, it can usually be found in the coin door break plug... cab side only if not already in use. Always consult your game's manual to see what power is available to you in your particular cab.
Of course, if this is going into a cab of your own design, you can provide the power directly from your power supply up to the area of your control panel. You'll still need to use a break connector just prior to the TB.
Ready to smoke test it.... good luck & Happy Gaming....
PostScript: I mentioned that I used a broken case to experiment with years ago, and I should mention how many of these cases were prematurely sent to the junk pile :-( It seems ops.... and now hobbyist... frequently wanted to use a no-no shortcut to testing their optic bds in these units by prying them up at the case "T" that holds them in place, enough to slip the bds out :-( Don't be caught caseless because of this needless shortcut... spend some quality time with your TB & it will be around for many years to come :-)