I'm going to snap a few pics here as I revive an old rusted & seized up Wico 2 1/4" replacement trackball unit. I'll try to include answers to any FAQ's pertaining to trackball units as I go along. The first of these is whether they will fit on a Happ mounting plate and the answer is that they will. All the trackball units have the same bolt hole pattern in their size,i.e., a 2 1/4" trackball from Wico, Imperial, Dukinc, Happ or other OEM, will all fit on a 2 1/4" TB mounting plate. Can you imagine if they didn't :-( If Wico had a 100,000 units made up in their own style of mounting & you went to install one on, e.g., a Centipede control panel & found they would not match the bolt hole pattern... hmmmm... Wico's phone lines would be tied up indefinitely... as would any of the others!
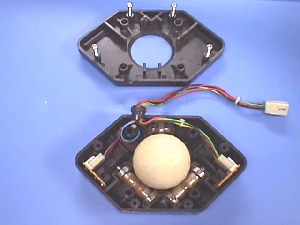
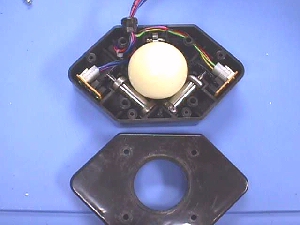
The first thing to do is remove the 4 screws that hold the two halves together. I put them back in the top half, so that you can see the layout for them in the pic above. Take note of your wiring for later reference & remove the rollers & bearings (most likely rusted together as the pair below were).
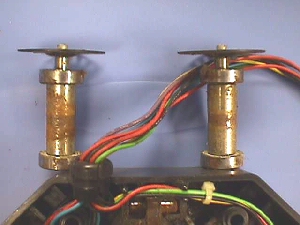
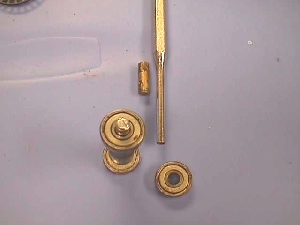
Although these are pretty well rusted the wear line in the center of each roller is not too bad & had there been less rust they probably could be reused. The reason that these particular ones could not be reused was that the rust had eaten into the shaft making it pitted & scalloped, hence making for a herky-jerky ball movement rather than the smooth gliding ball that you need. I'll tell you what to do with these rollers & bearings in a bit, but it's best to continue disassembling for right now & the reason will be forth coming.
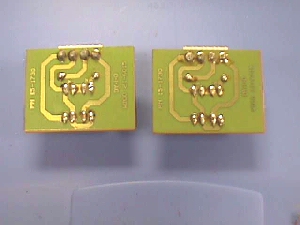
In the pics above & below you should take note of the wiring to the optic bds. Like any other trackball unit, the red & black wires are +5 volts & ground and should never be reversed. Also take care when replacing these plugs on the headers to be sure you do not miss a pin & hang out over one end or the other of the header. Doing so will destroy the optic bd. Your 2 outside wires in each connector are the clock & direction. As with other trackball units, you can reverse these to achieve proper control on screen. If you find that when you roll the ball upwards it responds with a downward motion on screen, or when you roll the ball left to right the responce on screen is right to left, swapping the clock & direction wires will correct this. The positioning of the whole unit will also effect clock & direction, so make sure that you don't just have the unit upside down before moving wires. You could get into a perpetual changing of the wire positions if not careful :-)

K... now you can pull the harness, optic bds the four seating springs. If you use a spring hook to remove the springs take care that they haven't been welded in with some Cola at some point in the past :-( Once the springs are out you can take the housing & the ball and soak them in some Fantastik while you're looking into whether or not you can save your bearings & rollers.
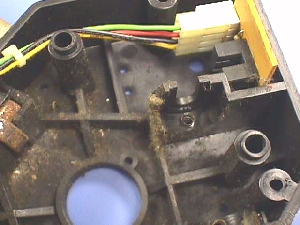
Be sure to look over the pins in your harness connectors & check the header posts on the optic bds to see that they are soldered in good.
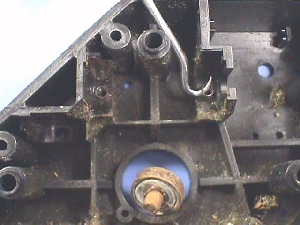
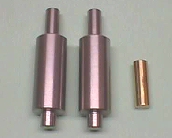
If you're going to try & save the rollers or the bearings, or both, you'll have to separate them. The best way I've found is to place the bearing on the open jaws of a vise & gently tap the end of the shaft being careful not to mushroom it. If they are welded real tight you may want to soak them in some penetrating oil first. To protect the threaded ends you'll need to thread in a 1/4" x 440 screw & tap lightly on it to free up the bearing from the shaft.
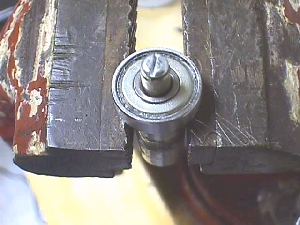
The shaft is not secured in the vise, but rather suspended by the bearing, and using a blunt end punch will help insure that you do not mushroom the ends, making it necessary to file them before you can insert new bearings.
Be careful not to slip with the punch & damage the bearing. I used the one above & you can see it is slightly smaller than the shaft diameter, so that it doesn't damage the race of the bearing.
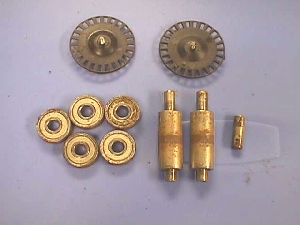
You can attempt to salvage your bearings the same way as described on my Help Page here. Using a Scote Brite pad on the shafts will clean them up, although it will not even out any pitted areas. Here's a tip for when it comes to remounting the encoder wheels above.... they should be in the center of the optic & not close to one side or the other. If not centered they may rub against the optic while in use. You can try flipping the encoder wheel over & if you are still off center you can insert a small washer behind it to act as a spacer.

Time to finish up the cleaning of the ball & housing that has been soaking. After scrubbing them up they should be rinsed thoroughly in cold water & a hair blow dryer will help speed up the drying. Once completely dried it's just a matter of reversing the disassembly process starting with the springs & stuffing everything back in there whether it be the salvaged parts or new parts.
Lube the bearings & close the hood... you should be good for another 100,000 miles :-)
The new roller set for the Wico 2 1/4" TB unit is available on the Parts Page here. Bearings can also be found on the Parts Page.
Happy Gaming....