|
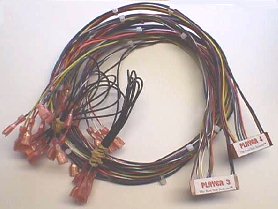
Although I have been making these Konami 3 & 4 player straight through harnesses for anyone who needed them over the years, they have not been listed on site, but so many are asking about them now that I decided to add them to the Parts Page along with details that I use, so that do-it-yourselfers will have a guide.
Before I forget, let me mention that many Data East bds & other import boards used this same pinout for 3 & 4 player hookups.
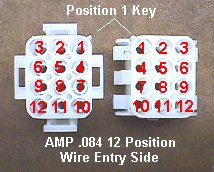
To keep expenses down on them I do not install a break plug to enable them to be used with other types of 3 & 4 player games, but I will put a guide here for anyone who wishes to do so. The cheaper connector to use is the Amp connector of 12 or 15 positions, but it is unforgiving if you make a mistake, without the the expensive extraction tool ($50), so maybe the Molex would suit your needs better.
Let me stray here for a moment & give you a quick tip to help you out of trouble if you should err with a pin/soc to a connector & do not have any extraction tools. If you have a spare socket of the same type, you can crimp & solder it onto a piece of solid copper wire from ordinary household wire, a large straightened paper clip, a piece of coat hangar or other similar material to use as a handle. Then widen the opening of the socket to allow it to slip over a misplaced pin or socket in your connector & this will depress the dogs/tabs to allow removal.
K... installing a break plug in an extra player harness is done much the same as with a JAMMA "kicks" harness and since the Konami only utilizes 7 wires to the control panel you'll need a connector that will interupt at least 12 positions allowing for other wiring such as a start button & more than 2 I/O pushbuttons.
Also, note that with the Konami using separate coin switches you'll need to put a 1 or 2 position break connector in the coin lines. You'll need to use a 2 position if you decide to carry both the coin I/O & the ground wire from the PCB's player header or you can use a one position for the coin I/O only & jumper grounds from your coin door ground used for the 1 & 2 player coin switches. Of course, there is the option of running the coin lines up to your CP through that connector along with your other wiring for use with simple pushbuttons if you do not require coins for play.
If you use 15 position connectors for each player you can assign the same positions as found on the .100 connectors as shown above, i.e., position 3 would be left, position 8 would be push 2 and any unused could be assigned to any task you wanted. I'll assign a random set up below using a 12 position connector for reference sake & you can use it or make up your own guide to use for all the 3 & 4 player games you'll be adding to your cab.
| Player Control Assignment |
| 1 | Left | Yellow |
| 2 | Right | Red |
| 3 | Up | Blue |
| 4 | Down | Green |
| 5 | Start | Gray |
| 6 | Push 1 | Orange |
| 7 | Push 2 | Violet |
| 8 | Push 3 | White |
| 9 | Empty | N/A |
| 10 | Empty | N/A |
| 11 | Empty | N/A |
| 12 | Ground | Black |
The easiest way for a novice to enter a break plug is to choose where you want it located for easy access when changing your game bd & simply cut one wire at a time & insert it into the position you assigned for it. Essentially, all you are doing is interupting your I/O lines so that you can redirect them to the proper location on a different game bd. Your CP side will always stay connected on the control panel, but may be hanging at the break plug unused if you had a 2 player game bd installed that did not need it.
Of course, for the creative player wanting to utilize the dormant controls while using a 2 player game, you can tap into your matching JAMMA I/O lines with a mating break plug connector so that player 3 controls become a duplicate of player 1 controls, while player 4 controls become a duplicate of player 2 controls. One reason that you may want a setup like that is so that playing a 2 player game with a friend allows you to use opposite sides of control panel giving each plenty of elbow room for those special maneuvers.
With the installation of a different 4 player bd you simply make up your PCB side to the correlating header on that bd, and then terminate into the position assigned on your CP break plug. For example, on the Konami PCB connector position 6 is "down" & goes to position 4 of my 12 position break plug assignment directing it to "down" on the CP. If you were to make up a PCB side for NBA Jam, "down" would be found on the PCB header at position 8 which you would run to position 4 of my 12 position break plug directing the line to "down" on the CP.
In the case of NBA Jam above, if you started with only the Konami CP harness installed, you would need to run the "start" line & the pushbutton 3 line on the CP side of your break plug, as well.
Each bd that you intend to use the 3 & 4 player controls with would have it's own PCB side that stays with the bd and is ready to plug up to the break plug directing your wires to the proper controls on the CP.
The basic Konami 3 & 4 player harness is on the Site Index under "Building Supplies". The connectors can be found on the Connector Page.
Happy Gaming...
|